Improve Your Home: 6 Really Low-Cost Fixes For The Bathroom

Have a Really Tight Budget?
Nearly every DIY show focuses on home improvement with almost no budgetary constraints. Most people I know don't have the money to spend on huge overhauls; instead, people look for quick, easy ways to improve what they currently have. Marble floors, fancy lighting, and whirlpool tubs are out of the question for the majority of homeowners. They're too busy paying off their mortgages. Most people want to spruce up their existing rooms, and the bathroom is often at the top of the priority list. Here are some very quick, very inexpensive, very easy ways to improve the look of your bathroom. I'll forego the usual "paint it" suggestion; I'm guessing that you know you can paint walls. The fixes listed here can be completed for a hundred dollars or less.

Replace the Plates
A quick way to improve the look of any room, never mind your bathroom, is to replace old outlet and lightswitch cover plates. Chances are the ones in your bathroom right now have been there since the start, while the walls around them have been painted repeatedly. Don't get too fancy with the new plates; avoid patterned or over-stylized designs. Keep it simple and clean, possibly matching the fixtures in your sink and bathtub. You'll be surprised at how much of a visual difference tiny cover plates can make. Keep in mind that newer bathrooms have GFI outlets, so make sure you purchase covers that accommodate this.
Since you're replacing the covers anyway, take this opportunity to insert foam insulation gasket covers behind outlets and lightswitches if they are on exterior walls. People often don't realize the drafts that come through these gaps; the gaskets will block cold air from entering uninvited.
Let the Light Shine In
Too often, homeowners opt for a level of privacy in the bathroom that includes blocking almost all natural light. Bathrooms are generally small and dark to begin with, usually having just one window (sometimes a small window at that). Choose a window treatment that affords you privacy, but also allows as much light as possible into the room. Unless you have a large bathroom, choose white or off-white, regardless of whether you decide on blinds or a curtain. My suggestion would be to go with something that isn't fabric: curtains in bathrooms tend to stain in the constantly damp air.
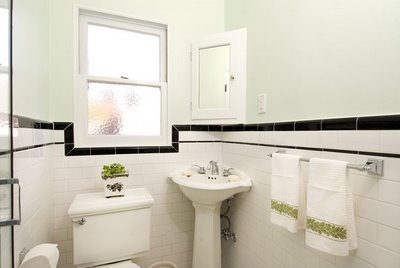
Another option is to do what the homeowners have done in the picture of the bathroom above, which is to frost your window. You can use a spray frost for this, or more commonly, buy a frost privacy window film. Either process is pretty simple. The advantage to this is you really maximize the amount of light coming in to your bathroom. The only option that consistently gives you more light is to leave the window bare, and if you're up a couple stories and there is no viewing angle into your bathroom, you might want to consider doing just that.

Speaking of Light
While we're on the subject of brightening your loo, nothing casts a dreary pall over a small bathroom more than a dark shower curtain. So many homeowners, in an attempt to add color to an otherwise fairly white room, choose a shower curtain/liner that closes the space. Avoid the temptation to add contrast this way; instead, stick to light colors for your shower curtain. (Add color contrast through the use of towels, a bathmat, and artwork, if necessary.) The shower curtain constitutes 60% of visible area in some bathrooms, and it's foolish to darken this many square feet.
If you're not overly concerned with a fashionable appearance, another idea is only to buy a liner and not worry about a formal curtain. If the liner gets old or mildewy (and be sure to buy an anti-mildew liner), buy a new one, since they are relatively cheap and a major hassle to clean properly. Don't buy a "pocketed" liner, which has pouches for your shampoo, conditioner, etc.. These are germ-factories.

A New Shower Rod
Since you're getting a new curtain anyway, why stop there? A quick and easy way to improve the aesthetics and functionality of your shower is to install a curved, or hotel-style shower curtain rod. This type of rod looks more stylish, since it cuts down on the blocky visual created by most older tubs. It also adds practicality, since it allows for more elbow room while showering. There's a reason nice hotels use these rods; they appear graceful and inviting. On the inside, you'll increase space by up to 40%, and soon you'll wonder how you ever fit into that cramped old shower. Replacing a curtain shower rod also doesn't require much in the way of tools. A screwdriver and perhaps someone to hold the other end are all you'll need.

Time to Recaulk
The appeal of your bathtub is dramatically improved by recaulking the seams, if applicable. It's not hard, and it's necessary not only to improve the appearance of your bathroom, but also its lifespan. Poorly applied or degraded caulk can allow water to get in all kinds of places it doesn't belong, and water damage is one of the most common and most difficult obstacles in maintaining your home.
Start by using an antimildew spray if your the line of caulk is discolored or speckled with black. These sprays are powerful, and some require no scrubbing on your part. It's possible you don't need to recaulk at all; the use of one of these sprays can help you determine that. Make sure that you rinse off the spray's residue after a given amount of time (follow the directions on the bottle), as you wouldn't want to damage the tub itself.
If the caulking around your tub is beyond the help of a spray, redo it. Buy a similar-colored silicone caulk, and clean out the old line with a utility knife, taking care not to scratch surrounding surfaces. Make several angled passes, and the majority of the the old caulk should strip right off (use a small scraper if you need to get the rest). Use a mixture of bleach and water on an old toothbrush to clean the seam, in case any mildew has developed behind the caulk, and then wipe thoroughly with a damp cloth. Let it dry, and then apply the new silicone. Use painter's tape along the edges if you're unsteady, cut the tube of silicone at a 45 degree angle with the utility knife, and slowly pull the trigger on the caulking gun while making a steady pass along the seam, angled side of the tip down. This might take a little practice, but you'll learning a skill that will be handy for the long-run. When you're done, your bathtub will have a whole new life.

Fancy Up That TP
I saved the best for last. Well, not exactly. Traditional toilet paper dispensers are fairly ugly, and the off-putting style didn't change for years. If you have no extra floor space, invest in an upgrade of what you have now. Times have changed, and chrome or satin nickel looks a lot better than the clunky wooden holder you have now. Assuming you have a little floor room to use, buy a stand-alone toilet paper dispenser. Some of these holders include a reserve area for another roll or two. Look at it this way: if you have to stare at toilet paper, at least make the vision as clean and shiny as possible. A new toilet paper dispenser won't cause you to do backflips for joy, but combined with the five other easy, inexpensive fixes listed here, your bathroom will undergo an obvious change for the better.


